Showing posts with label Duck Egg Blue. Show all posts

7 September 2017

#25Project: Raglan, Wales!

It gives me the greatest pleasure to present you with the latest 25 Project – this time from Wales! As it's 'back to school' for a lot of you this week, I thought it fitting to share this transformation of a gorgeous old school hall with you.


With a population just short of 2,000 and the nearest town of Abergavenny 15 miles away, this Old Church School Hall has always been a focal point for the village of Raglan. A little history first: built in 1857, this hall started as a local community school. In World War II, many of the families in Raglan opened up their homes to evacuee children and so the school had to accommodate an influx of new children.


Over the years, as the old school became a hub for the local community, it understandably started to show wear and tear. Together with some fantastic volunteers – young and old – my Stockist Lucy Hywel, who runs That's Lovely That in Abergavenny, gave the place a much-needed facelift.


Using mainly Old White and Duck Egg Blue, they really made a feature of the wood panelling on the walls. Touches of Aubusson Blue help bring everything together, creating a warm, welcoming atmosphere.

I've been told that, since the completion of the project, two new clubs have been formed and are now using the hall for Yoga and Tai-chi. This, along with the other organisations and clubs that use the space already – that's martial arts, kids clubs, art groups, film nights, and girl scouts. Phew!

Well done to everyone who participated in this gorgeous transformation. May the Raglan Old Church School Hall continue to be used by the community for at least another 160 years!

Yours,

Annie

4 November 2016

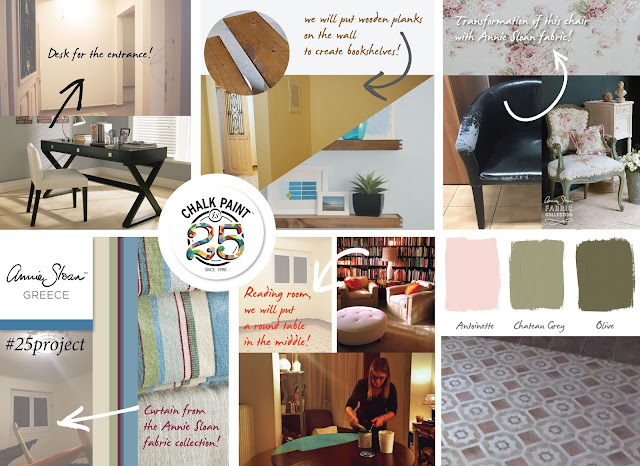
#25Project Transformation 3: Athens, Greece!


The finished #25Project transformations are coming in thick and fast, and a few weeks ago I was lucky enough to visit one of the selected spaces in Athens, Greece. This was the first project that I've actually been to visit, and seeing first hand just how vital the space is to people and the impact that my paint could make was quite overwhelming.

I was a little daunted as to what to expect, and truth be told, I was a little unprepared for my visit. What I found there and what I came with after the experience was nothing short of incredible.

The location was in an old theatre-turned-community-centre is situated in the heart of Athens. It receives around 400 visitors a month, mainly people who have been affected by the recent economic crisis. With a focus on art therapy, the day centre allows people to participate in art, drama and music, and gain general life skills.

What was needed was a quiet, serene place where the people who use the centre could come and relax. First, the basement was selected as a suitable location and my distributor in Greece, the incredibly dynamic and wonderful Elsa, along with an army of volunteers, began clearing the space.


They then, with amazing determination and organisation, designed a perfectly calm space full of soothing colours and a simple design perfect for the members of this day centre. They chose a light colour palette of Duck Egg Blue, Antoinette, Versailles, Olive and Old Violet which you can see in their designs laid out in the moodboard at the start of this post.


I love the way that my stencils were used around the venue, as borders and to create interesting detail to the edge of shelves. Take a look at these gorgeous details below.


With my paint and products – and the incredible work of local stockists and volunteers – the dark, cluttered space became a tranquil escape, just what the community needed. I hope that my photos and words do this place justice!


I'll be revealing more transformations from the #25Project soon. Follow me on Facebook, Instagram and Twitter to stay up to date!

Yours, 

Annie 

21 October 2016

#25Project Transformation 2: Ottawa, Canada!


This time last year we were busy planning the #25Project, so it's incredibly rewarding to see it all come together a year later!

Today I'm sharing the transformation of the lounge and kitchen of 215 Wurtemburg Street in Ottawa, Canada - one of the buildings that Ottawa Community House (OCH) operate to home 120 people. OCH is Ottawa's largest social housing provider and provides homes to over 32,000 people with special needs in the city. As a large non-profit organisation they often have to prioritise structural repairs and renovations over aesthetic changes to the building, so the space had been left looking very tired and dated, with scratched and damaged furniture.

Katrina Barclay, my Stockist at Malenka Orginals in Ottawa lead the project along with volunteers from OCH and 11 of her regular customers. (Two of these actually participated in Katrina's first ever Annie Sloan workshop, 4 years ago!)

Initial ideas were brought together at a meeting between Katrina and OCH, discussing the wants and needs of the people who use the space, and then, on 8th September the transformation began!


They kicked off the transformation with words of thanks and support from the Mayor of Ottawa, Jim Watson, who stressed the importance of giving back to, and caring for the community. After the speeches were done, the work got underway. One team started by painting the main area in Paris Grey, and another smaller team worked on painting the walls of the kitchen in Duck Egg Blue. Others painted the furniture which included an old radio cabinet, a book shelf and 3 small side tables, which were all a mis-match of brown woods. Don't they look brilliant now that they've been brought together with Aubusson Blue?

Before and after of the lounge
Before and after of the kitchen
They finished the transformation by hanging a couple of new additions to the wall which had been donated by Malenka Originals. The map of Ottawa-Gatineau from a local shop who specialises in handmade goods now takes the pride position above the newly painted radio cabinet.


Katrina wrote to me after the event to let me know that everyone that took part had a fulfilling and fun day, albeit quite tiring! And I'm glad to hear that everyone loves the new contemporary looking space. Haven't they done a fabulous job?

This is the second of 25 transformations, so watch this space to see further transformations as and when they come in. Follow the #25Project on Instagram, Twitter and Facebook to watch the projects come together.

Yours, Annie

18 July 2015

Karen Donnelly's Riverscape


For her third Painters in Residence project, Karen Donnelly used my paint, Chalk Paint®, to update this plain cabinet with an elegant riverscape depicting sailboats on her local river.

Karen is an artist who normally works in oils and watercolours. She'd known about my paint for some time through her sister (one of my Stockists in the USA), before experimenting with using my paint in a similar manner to other artists' paints – and the results are beautiful. I knew that Karen's paintings would look brilliant painted directly on to pieces of furniture, and asked her to do this, with my paint, as a Painter in Residence.

For this project, Karen took a modern piece of furniture with simple lines and shapes – a piece that lent itself well to being painted in this manner as it wouldn't detract from the landscape. Karen painted the whole cabinet thickly in Duck Egg Blue to create the background colour and texture, before painting the riverscape using a simple palette of Old White, Napoleonic Blue, Antibes Green, Olive and Arles. She then finished with a light coat of Clear Soft Wax all over.

Have you tried using Chalk Paint® to paint a landscape?


Yours, Annie


Follow this blog for exclusive pictures from Karen's residency and follow her on Facebook.

And remember to follow #PaintersInResidence on Instagram and Facebook, as well as my Painters in Residence board on Pinterest.

8 May 2015

Agnieszka Krawczyk's Old Violet Side Table


I fell in love with Agnieszka's work after seeing it online – her technique and recognisable style are inspiring. I admire the way she experiments with my paint, Chalk Paint®, and explores the art of decorative painting. 

For her third Painters in Residence project Agnieszka applied Chalk Paint® decorative paint in a whole range of colours – Old Violet, Louis Blue, Henrietta, Emile, Paloma, Duck Egg Blue, French Linen, Original and Old White. She applied the paint thickly to create texture. Along the way she used scrapers, sand paper, a putty knife and woodworking tools to scrape, sand and chip away at the layers of paint – creating beautiful character and revealing areas of colour. This technique results in a piece that looks like naturally worn paint work – aged and distressed over time. 

Agnieszka finished the piece in my Soft Clear Wax – this protects the surface and adds a little depth to the colour.

Have you been inspired by Agnieszka's work to create your own heavily distressed piece?


Yours, Annie


Follow this blog for exclusive pictures from Agnieszka's residency and follow her on InstagramFacebook, and her website: www.beforeandafterblog.pl 

And remember to follow #PaintersInResidence on Instagram and Facebook, as well as my Painters in Residence board on Pinterest.

6 March 2015

Agnieszka Krawczyk's decollage chest of drawers


This stunning chest of drawers is the first project from my new Painter in Residence, Agnieszka Krawczyk. Agnieszka has a great style and her projects are so interesting partly because she uses a technique that involves creating texture and layers through the use of woodworking tools, such as chisels and scrapers. She applies layers of paint thickly and then scrapes, chips and sands away to create interesting texture and layers. This technique reminds me of décollage, a technique that artists such as Robert Rauschenburg and Yves Klein used in the 60s – layering posters and ripping in to them to show previous layers. But at the same time there's an antique, vintage look – the piece looks naturally aged and distressed.  

Agnieszka used a palette of Provence, Pure, Old White, Napoleonic Blue, Antoinette, Louis Blue and Antibes Green on the outside of the chest, to create layers of colour and texture. Some of these colours were used as they come out of the tin, others were mixed to create softer and lighter shades. As soon as the paint was dry she used a scraper, sandpaper and putty knife to begin chipping in to the paint.

The inside of the drawers have been painted in Duck Egg Blue, and the edges have been painted with Napoleonic Blue to frame the shape. To finish the piece Agnieszka used Clear Wax – this seals the paint and makes it wipeable.

Have you ever used my paint to create a chippy, distressed texture? Agnieszka's work has really inspired me to pick up some different tools.


Yours, Annie


Follow this blog for exclusive pictures from Agnieszka's residency and follow her on InstagramFacebook, and her website: www.beforeandafterblog.pl 

And remember to follow #PaintersInResidence on Instagram and Facebook, as well as my Painters in Residence board on Pinterest.

18 February 2015

Beau Ford's Striped Side Cupboard


This gorgeous sideboard is the last project from Beau Ford's three months as a Painter in Residence. Beau's neighbour in rural Australia inherited the cupboard from her Grandfather and had been storing it in her shearing shed. Beau cleaned off the cupboard and used my paint, Chalk Paint®, to create a refreshed modern piece – a lot more fitting for the hip, growing family farmhouse that it was returning to.

Beau used a palette of Antibes Green, Duck Egg Blue and Coco to create the base block colours. The mustard yellow is a mix of English Yellow, with a spot of Emperor's Silk and Coco. Beau told me she seems to go the long-way round to find her perfect mixes – but I love her playful experimentation with mixing colours. It's something I always encourage!

The triangle pattern that runs vertically down the front of the cupboard has been hand-painted in Greek Blue using a very small artist's brush. The whole piece has been finished using my Clear Wax to protect the surface and make it wipeable.


I hope you've enjoyed following Beau's residency and feel inspired by her playful and bright projects. Later this week, I will be introducing you to my next set of three Painters in Residence, so keep your eyes peeled!


Yours, Annie


Follow Beau on InstagramFacebook, and her blog: http://drip-designsfurniture.blogspot.com.au

And remember to follow #PaintersInResidence on Instagram and Facebook, as well as my Painters in Residence board on Pinterest.

3 October 2014

Alex Russell Flint's Painterly Bathroom


The first project from Painter in Residence, Alex Russell Flint, is this gorgeous bathroom painted in my paint, Chalk Paint®.


Alex has updated his 19th century zinc bath tub using a mixture of Aubusson Blue, Antibes Green and Burgundy. He then finished the bath tub with Annie Sloan Clear Wax and a coat of Annie Sloan Dark Wax to deepen the intensity of the colour.

The lampshade in the room has also been painted with very diluted Chalk Paint® in Burgundy; the side table has been painted in Primer Red and then finished with Clear Wax. I feel the colours used really tie the gorgeous rich textures and tones of the room together. Alex's walls really set off the luscious reds in the room – to achieve a look like this you can use Duck Egg Blue and Clear Wax.

Have you used Chalk Paint® on a bath tub?


Yours, Annie


Follow this blog for exclusive pics from Alex's residency and follow him on InstagramFacebook, and his website:http://www.alexrussellflint.com

And remember to follow #PaintersInResidence on Instagram and Facebook, as well as my Painters in Residence board on Pinterest.

20 May 2014

Potato Prints


I love potato printing as a technique because anybody can cut shapes as I did on this cabinet (above). 

You don’t have to be able to draw, and I find that empowering – and isn’t that what my paint and products are all about? I’m much more interested in seeking people’s creativity especially those who feel or think they can’t draw – but in fact anyone can achieve a finish like this.

I printed this old cabinet a very long time ago – and it was old and shabby when I bought it in the mid 1990s! But I like the results: the top drawer has been worn away through constant family use and it’s been in each house we’ve owned for keeping gloves, keys, all sorts of things. So it has a sentimental value too.


Wonky work out

I did a rough concept of what I want to achieve but nothing exact – it’s all rather wonky but that’s its charm. I was aiming for a parallel design but something organic and fairly loose – not uniformly designed, and anyway that just won’t happen with this technique.

With potato (or carrot or cork, other good printing ‘tools’) you need to create some simple shapes– you can’t do anything very fussy because it ends up looking silly. These particular motifs turned into something African, tribal, aboriginal, it wasn’t intended – this effect is also partly to do with the colours I chose.

The small print

So here’s how I did it:

1. I painted the whole cabinet using Chalk Paint® in Primer Red and left it to dry.
2. The inside I painted using Chalk Paint® in Duck Egg Blue to add contrast.
3. Then I added a third Chalk Paint® colour - Aubusson Blue - over the cupboard and drawer surrounds and legs.
4. Next I painted Yellow Ochre (a colour no longer in the Chalk Paint® palette, but you could try Old Ochre here instead) on the drawer and insets.
5. I cut the potatoes in half with a kitchen knife (un-serrated) and got rid of the residual water by dabbing the exposed inside because a lot of water comes out.  
6. I then drew a shape on the exposed inside of the potato using a felt tip pen (below left).
7. Next I cut around the shape/outline using a knife to leave a relief (or raised area, below right).

8. I then put my potato halves on a tray of paint, dabbed some blobs of Chalk Paint® in Primer Red and transfer them – oomph – directly on to the cabinet surface.
9. Then I waxed lightly with my Clear Soft Wax.
10. And finally I rubbed back to give a more distressed feel.


This cabinet also featured in one of my earlier books How To Paint Furniture (1995) now out of print. Today the cabinet is still in use standing proud in our Oxford home after all these years – and with its original wax. 

If you would like to try your hand on another potato printing project, check out my more recent Quick and Easy Paint Transformations (CICO Books, 2010), the cover of which shows a side table polka dot potato print, and inside how to achieve this finish. 

Go on unleash the inner artist in you!

Yours, Annie


11 April 2014

Dialogue with a chest of drawers


I recently found a chest of drawers that I wanted to do something with but wasn’t quite sure what. That got me thinking about the whole creative journey from idea to execution to finish.

I want to take you on what is also an emotional journey, because it may be familiar to you (in which case it’s always good to share!), and if it isn’t, it probably should be!

Let your furniture speak to you
How I visualise decorating a piece of furniture is as important for me as the actual decorative paint technique and finish I end up with.

This chest of drawers had been ‘sitting there’, sort of staring at me for some time. I remembered the old adage (mine actually) that if you’re going to create an effect or finish, ‘allow the furniture to talk to you’ – because you have to be receptive to what the piece ‘wants’ [yes Annie communes with her furniture!]. Well let’s put it this way: if you try to impose something new on an old item like, “today I am going to paint a piece of furniture in a rococo style”, do you know what, it usually doesn’t work.

So yes, it’s got to be a finish or effect you’ve been wanting to experiment with, but it’s also got to be something that works with that particular piece of furniture.

This is especially true when you have a ‘difficult’ piece of furniture to paint, by which I mean you’re not sure which effect will work best, and/or the piece doesn’t present an obvious solution. And I do find some pieces can be ‘difficult’ – it’s not all plain sailing is it?

Back to the drawing board
And then there’s the fear of failure: this can have such a negative hold on creativity. Those creative talents (and we all have them) will flourish if you are able to be receptive to admitting something hasn’t worked out as you expected first time – and then changing it.
Don’t go “oh that’s awful!” and abandon it. Say instead “mmmmmm, okay, that doesn’t work, let’s try something else.”

For me the chest of drawers didn’t come with an easy solution, so it was all about being a bit lyrical, a bit ‘mindful’. That also means sometimes I have to leave it, walk away and come back again. There was no obvious decorative finish: instead it felt like it was just sitting there saying “c’mon then.”

From wash to white stripes to watercolour 
When I came back to it, I noticed it actually had quite a nice texture, the wood itself on the top was old varnish that had crackled a little bit. I thought it would be quite nice to keep some of that crackling and texture, so I decided to try wash drawing – spreading with a brush over the broad surface evenly enough so that no brush marks would be visible in the finish.

But when I looked at the finish it just didn't work for me. Then I had a bit of a brainwave: “Stripes” I thought.

I added a lot of water to the tabletop so it became very wet (there was paint in the water which made it thin).

Using my paint, Chalk Paint® in Country Grey, I painted opaque stripes across the top with the full width of the brush. It started to blend in a little so I took a dry cloth and just gently wiped the paint down.

So I have opaque-ish stripes, and thin, very water-coloury stripes. Then I thought “I know, I need a white line of opaque paint”. So I had three layers of stripes: grey, blue and white.

I added some Old White with a smaller thin brush as solid paint. I then sanded the chest of drawers to give texture, followed by a wax finish.


So to recap:
1.     Wash all over (use a fine diluted layer of colour on the surface you are going to work on)
2.     Paint translucent lines across the surface
3.     Paint thicker, watercoloury, wettish stripes that blur into each other
4.     Wipe it down with a cloth
5.     Add strong opaque stripes as desired
6.     Sand to give a texture
7.     Wax

I love the way watercolour works – it can be applied in various techniques such as wet-on-wet and wet-on-dry to obtain different effects. And you get thick and thin together. Working with wet paint also means the colours blur together a little bit creating new and interesting effects. Try it!

(By the way, I did also try the stripey look over the rest of the piece, but it just looked ridiculous and in the end I plumped for one colour – Chalk Paint® in Duck Egg Blue.)

‘Painterly’
The resulting painterly effect reminds me of something you might find in Charleston House in East Sussex.

Painterly? You ask. I’ve seen comments on my Facebook saying “is that even a word?” Well, yes, actually it is and it’s a word that painters and artists use a lot (and it appears to date back to c.1580s). To me it means ‘as an artist would paint’, and Merriam-Webster adds: “marked by an openness of form … and in which sharp outlines are lacking”.

It also felt painterly because the painting of the sea, which I found in a bric-a-brac shop, complemented the effect.

I also think it looks like a woven rug – with the textured paint strokes blurring into each other – and overall I am really thrilled with the finish.

Yours, Annie