17 December 2016

Annie Sloan Christmas Shelfie: Coloured Linen Stockings

The last of my projects, but by no means the least, these adorable little stockings bring lots of colour to my whole Christmas Shelfie scene. Easy to do, they make great little gifts on their own, but of course, they work best filled with lots of lovely treats too!


You will need: 


Firstly, make a pattern by drawing out your desired stocking shape, allowing for seam allowance and a hem for the top. Cut out your Coloured Linen using your pattern piece with the fabric scissors. Sew up your stocking and hem the top. For the fringed detail you will be folding in half a strip of linen the width of your stocking. Choose a complementary Coloured Linen, and hand stitch it with the contrasting embroidery thread, with a festive little stitch of your choice (as you can see I've used a cross stitch). Once completed start to fringe the fabric by pulling one thread at a time. Sew in a contrasting loop of Coloured Linen at the top to hang your stocking on your shelf! 

Voila! I love how bright and cheery they look, especially with the contrasting fringing. They make excellent presents too, I must say! 

Take a look at my Facebook page later to see them hung up on my Christmas Shelf! 

Yours, 

Annie 


16 December 2016

Annie Sloan Christmas Shelfie: Painted Birds

I found these beautiful wooden birds in November when I was in Cape Town for my stockist conference. They were from this incredible warehouse/market call The Old Biscuit Mill, which was full of little artisan studios and independent shops - just up my street! I took them back to my studio in Oxford and have been waiting to paint them. They were just perfect perched on my shelf, all they needed was a little paint of course!


You will need: 


With these sweet little birds, I loved the shape but as they were quite small against the other projects I needed them to stand out and hold their own, and not get lost amongst everything else. I chose my bright and bold Giverny as the main colour to paint them, with my black Graphite and Old White used to highlight the wings or the beak and also, as you can see, to just be a little free with the paint, too! I flicked and dripped the paint to create a really fun and rich patina. The whole idea is to be free and have fun, so this is a great little project to do if you have little ones!


Aren't they sweet? I love the way they look on the mantlepiece with the other projects, make sure you have a look on my Facebook page tonight to see them nestled here and there! 

Yours, 

Annie 

Annie Sloan Christmas Shelfie: Concrete Candle Holder

In my previous blog post I spoke about how, at this time of year, I love gilding. So here is another project that uses a little metal leaf, but this time with a stencil.


This candleholder was a gift from the wonderfully creative blogger Hester, who ingeniously made it by hand from concrete. I loved its handmade-yet-industrial feel, and wanted to give it some festive pizzazz with a little paint, some stencilling and some gilding.

You will need:


To recreate this look, first paint a solid line almost halfway up the piece, all the way around the candleholder, using masking tape and the small flat brush to create a straight line. Once dry, work out exactly where you will place the stencil. Here, I've reversed the stencil to create a cross, however you could flip it to create a diamond shape. The choice is yours! Using the masking tape to hold the stencil down, paint the design on the concrete all the way around.

Once the paint has dried, use your stencil again to dab a small amount of the Gold Size onto the painted stripe. As soon as the Gold Size has turned from pearlescent to clear, press the Brass Leaf down gently. Leave the leaf on for 5 minutes before wiping away the excess. You can now seal in the leaf and paintwork with Clear Chalk Paint® Wax.


And there you have it! I love the way it looks traditionally festive with the green and gold, yet the concrete makes it modern. What do you think of this project? And the projects for my Christmas Shelfie so far? Please do let me know!

Yours,

Annie

14 December 2016

Annie Sloan Christmas Shelfie: Gilded Wooden Logs


During the holiday season I find myself wanting to create all things shiny and bright, so you'll usually find me gilding anything in sight! These wooden logs were destined for the fire, but with just a little Gold Leaf they've turned in to something precious and worthy of their place on my Christmas Shelfie.


You will need:
  • Metal Leaf (I've used Brass here, but Aluminuim or Copper would look equally grand and festive.)
  • Gold Size
  • Stencil Brush 
  • Masking Tape 
  • Dry (very important that they are dry!) wooden logs 

I love highlighting one texture by contrasting it with another texture that's the complete opposite, and knew that adding a 'bling' strip of gold across the bottom of my logs would bring out the gorgeous natural patina beautifully. 

Using masking tape to create a crisp, clean line tape off your design and apply Gold Size with a small brush (I used my Stencil Brush to push the Size in to all those nooks and crannies) to the area that you'd like to gild. The Gold Size looks pearlescent in colour when first applied and will become clear after 5-10 minutes - this is when you should apply the leaf. Place the leaf on to the wood, gently pushing it in to the crevices using your fingers, and then 5-10 minutes later brush the excess leaf away with a soft brush. 

Carefully peel off the masking tape and then apply a little Clear Chalk Paint® Wax, or if you want to tone down the brightness try adding a little Dark Chalk Paint® Wax too.


Here they are, don't they look glorious? It's such an easy, simple and inexpensive way to create gorgeous festive ornaments, and they've received lots of compliments already!

As always, I'm going to be posting them looking all fabulous on my Christmas Shelf later tonight over on my Facebook page, so make sure you keen an eye out for them!

Yours,

Annie.

13 December 2016

Annie Sloan Christmas Shelfie: Boho Painted Candlesticks

Yesterday I introduced my Christmas Shelfie and the first painted piece to join my festive fireplace mantelpiece. Today I'm sharing project number two, my painted candlestick holders. 

I found these candlestick holders in a second-hand shop for under £2 and was drawn to their shape, although I wasn't overly keen on the shiny, metallic finish. So, inspired by the gorgeous hand painted designs I had seen in one of my favourite places, Charleston House in East Sussex, I painted a loose bohemian design on them. 


You will need: 


As I wanted a real bohemian, 'arty' feel I drew inspiration from the painted fireplace at Charleston House, with its decorative circles and lines painted by Vanessa Bell in the 1920s. I started by painting the candlesticks with a base colour of Scandinavian Pink – a colour very similar to the dusky pink used everywhere in Charleston! 

Once the base colour is completely dry you can add your designs.  I had planned a little bit of my design beforehand but mostly just freehanded as I went along, adding a little Antoinette circle here or Giverny dots there. I chose a gorgeous earthy, yet interesting colour palette of: Giverny, Old White, Honfleur, Antoinette and Château Grey.

When you are happy with your design, apply Chalk Paint® Wax to seal your work. 


And here they are! I absolutely love the way they have turned out, to see them standing proudly on my Christmas Shelf make sure you head over to my Facebook page later tonight! 

Tune back in tomorrow for another creative and quick project from my Christmas Shelfie!

Yours, 

Annie

12 December 2016

Annie Sloan Christmas Shelfie: Painted Wreath!

Introducing my Christmas Shelfie!

This week I'll be sharing six quick and easy, small projects that you can recreate at home to give your house a festive feel. They all look wonderful sat upon a fireplace mantelpiece, or on a living room shelf.

Today I'm sharing the first project - the painted wreath!


What you need: 
  • Christmas Wreath (This wreath was beautifully made by the wonderfully talented Lucy who works in my shop on the Cowley Road, Oxford. She is a florist and made this wreath out of the catkins of an alder tree.)
  • Chalk Paint® - As you know, I'm all about colour so the shades I chose to paint this wreath are of course, bold and bright! I chose Giverny, Antibes Green, Emperor's Silk and Florence, colours that I knew would stand out against the brown of the catkins.
  • Small Artist Brushes- These are perfect for getting in to all of those nooks and crannies. 


All there is to it, is to get painting! Try to distribute the colours evenly around the wreath to get them all work together in harmony. 


And voila! My finished wreath!

I love the way it has turned out, it stills looks natural and rustic, but adds a little colour to the room. It's going to take pride of place above my mantel shelf - which I'll be revealing later today on my Facebok page

Come back tomorrow to see the second piece that I've created for my Christmas Shelfie.

Yours, 

Annie  

29 November 2016

#25Project Transformation 5: Iowa, USA!

The smiling faces of all of the lovely volunteers! 
We're now a fifth of the way through the #25Project with transformation number 5, Muscatine Centre for Social Action (or MCSA)in Iowa, USA, now complete!

The wonderful work of MCSA instantly caught my attention during the nomination period for the #25Project. The centre provides emergency and temporary housing, healthcare, education and support services to local people in need, and is incredibly important to the community. I think that the wonderful turnout of 40 local people volunteering their time and services to the transformation is evidence of this!

The users and workers at this former YMCA chose to focus on transforming the family room – a room that hadn't been updated in over 20 years. I recently found out that the family suites and common area of MCSA were formerly a swimming pool, and that a generous donation from Phil Collins (yes, THAT Phil Collins) funded the cost of building a floor!

The before of MCSA
A huge thank you goes out to the lovely mother and daughter team of Cindy Tubandt and Jennifer Conard, who run Fresh Vintage in Muscatine, for organising and leading the whole transformation. They held workshops to teach volunteers how to use Chalk Paint® to paint chairs (that had been kindly donated by a local restaurant) and to dye pillows and curtains using the Shibori technique. The turnout from volunteers was so great that they managed to get the transformation complete in just the one weekend!

A shibori dyeing workshop


I love what a successful local project this has turned out to be. As soon as people heard that this transformation was taking place, more and more companies started to generously donate. From financial support to food supplies to electrical work, the whole space is now complete. It looks warm, inviting, playful and fun – a safe place of support. Well done to every single person involved in this project, it has been such a joy to see the photos of the space come in and I love this video that a local school created for the transformation too!

The painted chairs, don't they look sweet? 


Yours,

Annie

15 November 2016

#25 Project Transformation 4: Sweden!


I’ve loved sharing with you the transformations of the #25Projects as they come in, and there are still plenty more to come, 21 in fact! This week the space I want to focus on is a little train station cafe in a place called Hindås, in rural Sweden.

When I picked this place as one of the spaces I was intrigued to see how the end result would look, and as the pictures were sent to me I was amazed at the incredible amount of heart and soul went in to the whole process. What truly stood out was how much of a sense of caring and community came through, and this was cemented by the wonderful description of the event sent to me by one of the volunteers, Märta Waldrop.

So lovely and moving was this letter sent to me that I think it best that you hear from the volunteers in their own words about the transformation of the space.

Take it away, Märta!

Before pictures of the space. 


"On the morning of Saturday the 21st of October, giggles could be heard from a corner of the train station located in the middle of the fairly modest Hindås community. They had been going since ten, waving brushes and rollers dripping with Chalk Paint® around in a room where nobody had paid any heed for many, many years. Until now.

The room, which for many years had been nothing but a humble goods reception, was now getting a facelift. For what purpose? To make it into what would be called ‘Hedda's Room’

Hedda Rasmussen Key, who has been almost as overlooked as the goods reception that was now getting some attention, was the sister of author and suffragette Ellen Key. She was also married to a man named Yngve Rasmussen, the architect that made Hindås Train Station into what it looks like today.

Hedda Rasmussen Key 
Yngve Rasmussen


When it was announced that Hindås Train Station had been picked as one of the 25 winners of the #25Project, the room that got picked to be repainted and, in a way, resurrected, was the goods reception. In the spirit of bringing back something that has been a bit pushed aside in the big scheme of things, it was decided to dedicate the room to Hedda, making sure that she had a space to be remembered as well.


A room for a woman who lived during a time when she had no say in the community, and died after suffrage for women had become legal. In the spirit of this, although quite an alien notion in our modern times, women played the biggest role in redecorating Hedda’s Room.


Everything was painted, with the walls painted in Duck Egg Blue Wall Paint. Walls, chairs, radiators, tiles, cabinets, even the refrigerator went from orange to a striped design inspired by the fabric from the Annie Sloan Fabric Collection. Music was playing, paint was splashing, coffee was drunk, and some participants also fell over at times! Volunteers from both the local community as well as from miles and miles away came to help create this new space, and this collaboration between different people, old and young, helped infuse the walls with a sense of belonging and inclusiveness for all who’ll enter in the future.


Freedom, acceptance, openness, courageousness, and kindness. That is what this room will hold. More and more people will bring their stories to this room, during concerts and theaters, as well as during the weekly language cafés. This is a room for all people, people such as Hedda.”

How utterly gorgeous is that description? I believe it truly matches with the photographs you can see here.

Let me know what you think of this and the other transformations I've shared so far by getting in touch on Facebook, Instagram and Twitter.

Yours,
Annie

4 November 2016

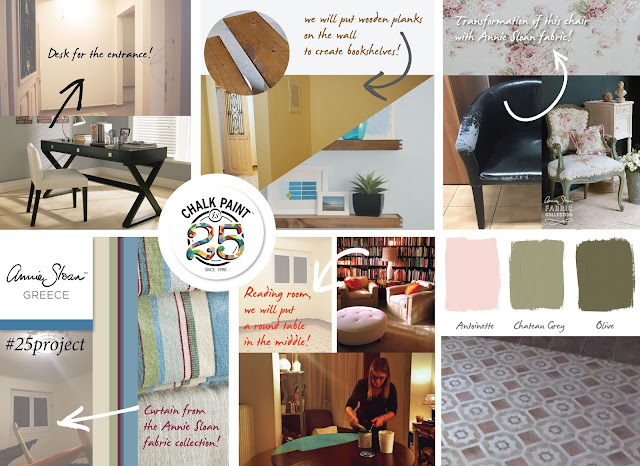
#25Project Transformation 3: Athens, Greece!


The finished #25Project transformations are coming in thick and fast, and a few weeks ago I was lucky enough to visit one of the selected spaces in Athens, Greece. This was the first project that I've actually been to visit, and seeing first hand just how vital the space is to people and the impact that my paint could make was quite overwhelming.

I was a little daunted as to what to expect, and truth be told, I was a little unprepared for my visit. What I found there and what I came with after the experience was nothing short of incredible.

The location was in an old theatre-turned-community-centre is situated in the heart of Athens. It receives around 400 visitors a month, mainly people who have been affected by the recent economic crisis. With a focus on art therapy, the day centre allows people to participate in art, drama and music, and gain general life skills.

What was needed was a quiet, serene place where the people who use the centre could come and relax. First, the basement was selected as a suitable location and my distributor in Greece, the incredibly dynamic and wonderful Elsa, along with an army of volunteers, began clearing the space.


They then, with amazing determination and organisation, designed a perfectly calm space full of soothing colours and a simple design perfect for the members of this day centre. They chose a light colour palette of Duck Egg Blue, Antoinette, Versailles, Olive and Old Violet which you can see in their designs laid out in the moodboard at the start of this post.


I love the way that my stencils were used around the venue, as borders and to create interesting detail to the edge of shelves. Take a look at these gorgeous details below.


With my paint and products – and the incredible work of local stockists and volunteers – the dark, cluttered space became a tranquil escape, just what the community needed. I hope that my photos and words do this place justice!


I'll be revealing more transformations from the #25Project soon. Follow me on Facebook, Instagram and Twitter to stay up to date!

Yours, 

Annie 

21 October 2016

#25Project Transformation 2: Ottawa, Canada!


This time last year we were busy planning the #25Project, so it's incredibly rewarding to see it all come together a year later!

Today I'm sharing the transformation of the lounge and kitchen of 215 Wurtemburg Street in Ottawa, Canada - one of the buildings that Ottawa Community House (OCH) operate to home 120 people. OCH is Ottawa's largest social housing provider and provides homes to over 32,000 people with special needs in the city. As a large non-profit organisation they often have to prioritise structural repairs and renovations over aesthetic changes to the building, so the space had been left looking very tired and dated, with scratched and damaged furniture.

Katrina Barclay, my Stockist at Malenka Orginals in Ottawa lead the project along with volunteers from OCH and 11 of her regular customers. (Two of these actually participated in Katrina's first ever Annie Sloan workshop, 4 years ago!)

Initial ideas were brought together at a meeting between Katrina and OCH, discussing the wants and needs of the people who use the space, and then, on 8th September the transformation began!


They kicked off the transformation with words of thanks and support from the Mayor of Ottawa, Jim Watson, who stressed the importance of giving back to, and caring for the community. After the speeches were done, the work got underway. One team started by painting the main area in Paris Grey, and another smaller team worked on painting the walls of the kitchen in Duck Egg Blue. Others painted the furniture which included an old radio cabinet, a book shelf and 3 small side tables, which were all a mis-match of brown woods. Don't they look brilliant now that they've been brought together with Aubusson Blue?

Before and after of the lounge
Before and after of the kitchen
They finished the transformation by hanging a couple of new additions to the wall which had been donated by Malenka Originals. The map of Ottawa-Gatineau from a local shop who specialises in handmade goods now takes the pride position above the newly painted radio cabinet.


Katrina wrote to me after the event to let me know that everyone that took part had a fulfilling and fun day, albeit quite tiring! And I'm glad to hear that everyone loves the new contemporary looking space. Haven't they done a fabulous job?

This is the second of 25 transformations, so watch this space to see further transformations as and when they come in. Follow the #25Project on Instagram, Twitter and Facebook to watch the projects come together.

Yours, Annie

12 October 2016

Revealing my new book!


Over the past couple of months there has been excitement in the air as my book, Annie Sloan Paints Everything – once just a little idea in my head – has been transformed into a reality. From the moment I picked up a brush to start the first project right through to holding a physical copy in my hands, I’ve been waiting for this day. Finally my 26th book is here and exclusively available through Annie Sloan Stockists before landing in all good book stores from November.


If you’ve already pre-ordered your copy from your local Annie Sloan Stockist or you just want to know more about how this book came about, let me tell you how my most personal book to date came to be. Over the past year, as I’ve opened up my Facebook and Instagram accounts, I’ve seen a noticeable change in people's confidence with colour. As you may know, to me, colour is everything, so seeing a brighter and bolder colour palette rather than the restrained and mutes tones of the past inspired me greatly. With this book, I wanted to showcase just how easy it is to invite colour into your home.


‘Annie Sloan Paints Everything’ has 40 step-by-step projects, covering everything from walls, floors, lampshades, and curtains, to footstools, cabinets and even fruit bowls. As you can image, every single surface is different! In this book, you'll find me painting metal, plastic, glass, burlap, linen, veneer, canvas, dust sheets, even rope, like this shelf unit below. I want my book to clearly and precisely give you the tools and confidence to easily recreate or adapt each project to suit you.

I feel very proud of this book and the pictures, taken by my wonderful photographer Christopher Drake, who I’ve been working with for nearly ten years! Together with my team, we strived to make a book that hopefully shows you just how easy and enjoyable it is to fill your house with colour!

Make sure you join me as I go "on the road" with ‘Annie Sloan Paints Everything’ across the UK. On Thursday, I will be at my wonderful stockist shop The Marmalade House in Bath for a book singing, and then Saturday, I'll be popping in to The Painted Chair in Liverpool (a city that I think is in the middle of an interesting cultural explosion). On the 27th October, I will be back in Oxford at my own shop on the Cowley Road for a book signing. If you can make it to any of these places do come and say hello!

Have you got your copy of the book yet? Which project are you excited to tackle? Please let me know as I cannot wait to hear your feedback! Tag me using @anniesloanhome or #anniesloan so I can see your thoughts!

Yours, Annie

Annie Sloan Paints Everything is published by CICO Books (£14.99). Photography by Christopher Drake © CICO Books

3 October 2016

Simon Olsson's Provence Cabinet.


Blue in all of its beautiful manifestations is dominating interiors at the moment. From dazzling sapphire shades, to subtle sky blues, right down to more moody, inky tones, this versatile shade seems to be everywhere. I love that people are embracing this multi-faceted colour right now. I think one of the reasons is because its so adaptable to almost any style and mood.

My Painter in Residence, Simon Olsson, has adopted one of the blues in my Colour Palette, Provence, as his signature colour. It makes sense that he would have chosen one of my brightest tones as his style is so influenced by the bold jewel-like colours of India.

Simon uses Provence often in his work and one of the greatest examples is this cabinet. Simon chose to create a rustic, chippy finish to create a sense of history.


When Simon first came across this cabinet, he wanted to lighten the dark wood and yet still keep it close to its Indian roots – and so Provence was the perfect colour choice. To create texture he used my Pure Bristle Brush, moving in all directions and applying the paint thickly. When the paint had dried he used coarse sandpaper to chip away at the paint work, creating that beautiful worn away patina. To finish the look, he covered the whole piece in a fine coat of clear Chalk Paint® Wax.

What do you think of this look? Have you used Provence in a similar way? Show me by tagging me on Facebook, Instagram or Twitter using #anniesloan or @anniesloanhome.

Yours, Annie